 Private streaming MP3 is problematic on S3 Cloudfront. It often does not play and you get no error message telling you what the problem is. The fastest and best way to deal with this is to convert your audio to M4a, the format used for iTunes.
I know, you are not looking forward to this as you probably have already a whole range of MP3 recordings. Therefore, you need an application that can do a whole batch of MP3 files in one go. M4a files stream without problems on S3 CloudFront. so instead of trying to solve the problems by messing around with leaving off file extension names and such (often given as a hit-and-miss solution for streaming MP3s), it is a better idea to create an automated work flow that guarantees that your audios will stream properly.
The folks from Xilisoft were so good to give me a license to test the audio converter they produced, so this is a good moment to test if it works for our purpose:
Xilisoft Audio Converter – Review
Xilisoft Audio Converter is a handy application that does all the work for you. The interface is clear and easy to understand. On the right is a panel to create profiles for advanced users, while at the bottom you have preset profiles for novices. The Profile presets are best used if you do conversions for the first time. Later on, you will want to create your own audio profiles.
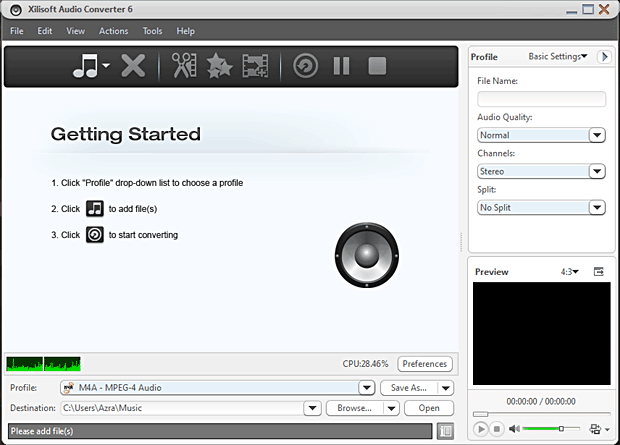
Let us jump right into this: First you select the conversion method by selecting a Profile. In this case, we select M4A – MPEG-4 Audio in the Profile list at the bottom:
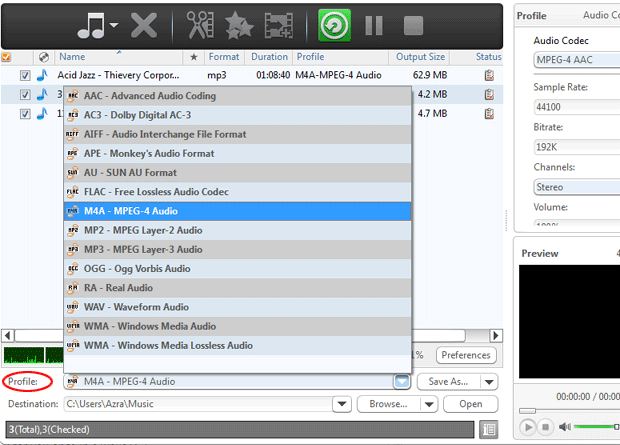
Then, add all the audios you want to convert. In the example above, I firstly added the audios I wanted to convert, but to make it easy for you, you best select the conversion method first and then add the audios because then the correct format is automatically selected for all newly added audios.
You can change set the conversion setting anytime, one-by-one or for the whole batch in one go by selecting them all.
When finished doing that, select the Destination folder, then hit the Convert button and let the application do the hard work while you read the morning paper or even work further on your computer while the converter works in the background.
![]()
Conversions are CPU intensive and it eats quite a bit of RAM, but this application lets you set the priority in the Preferences section. So, if you want to work while the conversion goes on in the background, you can set it to low priority. This will slow down the process but you won’t have problems working on your other stuff in the meantime. Depending on the computer, you have to experiment with this. Generally, I tend to leave the setting to normal and let the converter do its work while I mess about with paperwork. Is it not wonderful to let the computer work for you once in a while?
Determine the compression method of the original audio
It is important to understand that you cannot pile compression upon compression on an audio because every compression deforms the audio a bit. So, if you have heavily compressed MP3 audios, it is important to limit the damage as much as possible. This is where your own profiles come in and here I will show you how to do that. But first, you need to know how your original audio is compressed.
If you add an audio file to convert in the application, you can right click on it and select Properties. This will give you an overview of the compression method used for this audio:
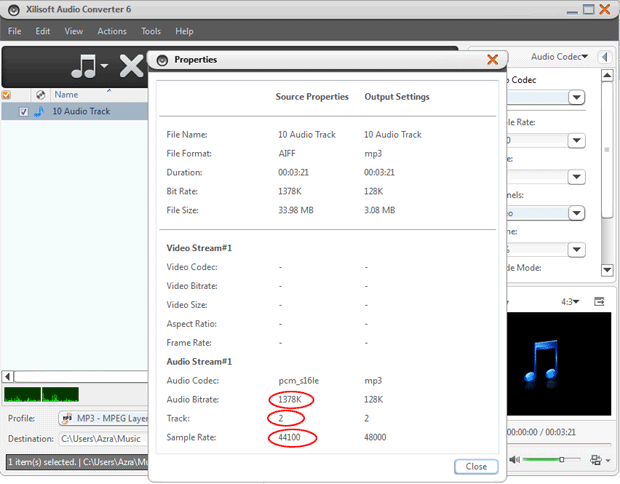
As you can see, from the example above (red ovals), the Audio Bitrate is high, namely 1378K and for Track, there are 2 tracks (channels), therefore this is a stereo audio. The Sample Rate is 44100. Don’t worry, this tech speak is explained below. In any case, this is clearly a high quality audio which can be compressed without much loss, but changes are that your own audios will have stronger compression, like this example:
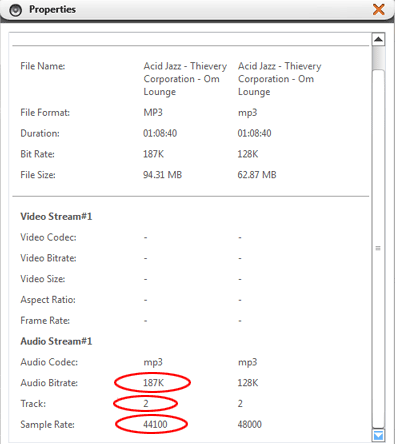 Here we see that the Bitrate is much lower, namely 187K and it is again a stereo track since it has 2 channels. The Sample rate is also 44100, so the only difference is the bitrate.
Now, one thing is important, you have to keep in mind that this needs to play from the internet. So, the 1378K bitrate of the first example is generally too high to play from a browser, while the second example is actually very good to play online as it only has a bitrate of 187K.
As such, we have to match the output profile more or less like this audio. Again, it makes no sense to make it better because that is not possible. You cannot add information to an audio by setting its bitrate higher, for instance.
Taking this example file, I think this is the moment to go a step further and create our own Audio profile which we can use time and time again.
Creating your own Audio Profile
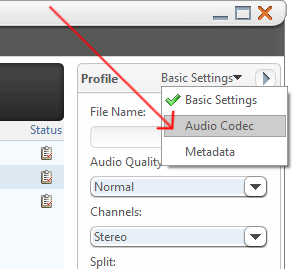
On the right, you have a pane where you can create your own profile. Select Audio Codec in the drop down list. This will change the values in the fields below it. Now you will be able to tweak those values to its ideal settings and save that profile for later use.
The first field shows the Audio codec type or compression method (see the image below). Make sure it is set to MPEG-4 AAC. This is the basis for our M4a format. Then you have the Sample rate, set this to 44100.
Bitrate is in fact the amount of Kilobits per second (Kbps) that is streamed while the audio plays. The minimal setting should be 128K because lower then that, quality deteriorates rapidly. If you have a good quality MP3 audio, you may even set this higher. With our second example, you could set this to 187K or 128K to make the audio smaller in weight. This way, you keep a very reasonable quality.
Channels, depends again on the original audio. It makes no sense to make a mono into a stereo, therefore you 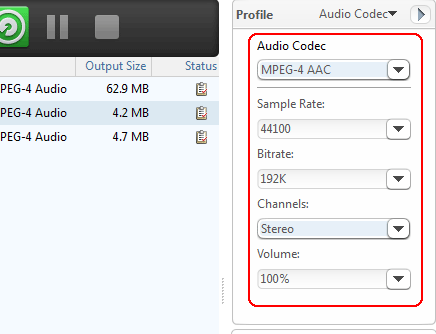 may want to create two profiles, on for mono and one for stereo. Mono means that the audio has one channel, while stereo has 2 channels, making the sound 3-dimensional, so to speak.
Volume is something you only change when the audio has an abnormal sound level. for a profile, leave it to 100%.
Now you have created your profile, you can save it by clicking on Save As, right next to the Profile drop down list:

You can call it M4A – audio stereo if you like. Once you have done that, this profile is added to the profile list and its always accessible to you. Go ahead and make a Mono version also.
Converting the audios
If you have already added audios, select them all by either typing CTRL+A (PC) or Command + A (Mac) or Shift click a whole row, or just select files with CTRL-click if you want to omit some of them.
- Then select the profile you want to use for these audios.
- Select a destination folder below the profile list
- Now, click the Convert button.
You may find that the application does this pretty fast but it depends how long the audios are, of course. The newly converted audios are saved in the destination folder. Once the audios are converted to M4a, you can stream them without problems with CloudFront.
Why should you use streaming as opposed to progressive download (which is the norm)?
There are several reasons:
- first of all, the audio is not downloaded on the user’s computer, so it will start to play faster if it is a long audio.
- secondly, the user can jump anywhere in the time line without having to wait a long time before the audio resumes playing. This is called random access.
- With private streaming, you have 2 layers of protection against theft.
![]() I like Xilisoft Audio converter very much. It is easy to work with, the conversions are fast, yet the quality is good. However, what I do not like about it is that it freezes when you deny access to the internet when you start up the application. I do not see why the application needs to connect to the internet, therefore it loses a star for this.
I like Xilisoft Audio converter very much. It is easy to work with, the conversions are fast, yet the quality is good. However, what I do not like about it is that it freezes when you deny access to the internet when you start up the application. I do not see why the application needs to connect to the internet, therefore it loses a star for this.
For the rest, all is well as far as I am concerned.

thanks for the article, however, I wish these articles had a date published on them. Often times older information needs rechecked to latest updates. But since this article does not have a timestamp, i cannot know if the information is actually still relevant.
especially considering I have not noticed any problem using amazon’s S3 “streaming” service for rtmp MP3s without any noticeable issues. But since I don’t sit and click through our audios and listen to everyone one consistently like our clients do, I wonder if this article has any bearing on possible unknown issues.
Hi Grey,
The information is still relevant, yes. The article is only a couple of months old. But you have to keep in mind this is about private streaming. Regular streaming works. If your MP3’s are playing, they will play for your audience too. It doesn’t depend on the client side.
I do know that quite a few issues with MP3 have been reported on the S3 Amazon forum and I had problems too. It probably has to do with how the audio is encoded exactly, but I found no documentation on that. Various “solutions” were offered but none of them worked for me. Therefore, I offered an alternative.
hello
i’am looking for a solution for audio streaming based on TTS solution ( amazon poly ) i whent to have an aplication where i can put text ( input )
and in result have live streaming audio under subscription portail ( output )
between the two the text have to be translated to voice using amazone polyit will be like a web radio
Text input >> amazone poly TTS translation to voice >>> live stram the voice
the final result have not to be public and only member can have acess
additionaly to the voice i will publish the original text with historic
any solution for this?