 Embedding a video/audio playlist is not difficult at all, it only requires your full attention. In this tutorial (part 2), I’ll show you how to embed a dynamic playlist. A dynamic playlists differs with a regular playlist in a sense that you do not need to create a separate xml file. For this tutorial, you need to download and install JW Player 5.10 and you also need a S3 Amazon/CloudFront account.
This version of JW Player is no longer available, but we keep this tutorials for those who still have a copy of version 5.10
Note: Dynamic playists for streaming video is no longersupported in JWplayer 6.x,you need to work with a .smill playlist instead.
If you missed the previous tutorial, How to Embed Streaming Video & Audio with HTML5 Fallback – using JW Player 5.6, please try that out first before you proceed because it explains installing JW Player, embedding video/audio and configuring your CloudFront account in great detail. As long as you cannot embed a video, this tutorial won’t help you a lot, unless you are already acquainted with JW player and want to move on quickly.
Write the details down to work quickly
It is best to be organized and get all the info you need in one place so that you can copy and paste rapidly. You may open a text editor or work directly in the editor of your website. A text file is probably most convenient since you can save it as a template for later projects. Here you find an example of you will need:
width: 600 height: 400
name: video-1.mp4
name: video-2.mp4
name: video-3.mp4
streaming distribution: s3advzb3o45ezk.cloudfront.net
bucket name: ardennesinfo.s3.amazon.com
flashplayer: http://www.yourdomain.com/mediaplayer/player.swf
javascript: http://www.yourdomain.com/mediaplayer/jwplayer.js
What does the above mean?
width and height sets the dimensions of all the videos in the playlist. You actually do not need to downsize the videos to fit these dimensions. The player fits them nicely in the player window. This settings will determine the size of all the videos in your playlist. It is not possible to vary the size per individual video.
name: As you can see, I wrote down 3 names. You may add as many as you like. For clarity I kept it simple, but you need to use the real names of videos and make sure they contain no typos. Double check, because there is nothing so frustrating as a video that does not show up.
streaming distribution: As explained in Part 1, you need to get the streaming distribution name of your bucket. If you have not prepared such a bucket, do it now and retrieve the name, like 1s3advzb3o45ezk.cloudfront.net for instance. Yours will be different, of course.
bucket name: Is the original name of the same bucket you use for the streaming distribution.
flashplayer: Indicates the path to where JW player resides on your domain. We presume you installed JW Player in a folder called mediaplayer but you can call it anything you like, of course.
javascript: Indicates the path to where the JW player javascript resides on your domain. This is the same folder as for the JW player itself.
OK, have you written down the details en checked for typos?
Now we need to adapt the following line of code, which we are going to place in the header of your page:
<script type='text/javascript' src='http://www.yourdomain.com/mediaplayer/jwplayer.js'></script>
Change the red part in that line of code to reflect the location of the jwplayer.js on your site. Since you wrote that path down in your text document, this is easy.
When you have done that, copy this line of code again.
Now open the html page with a html editor. If you work with WordPress, you best follow this tutorial: Linking-a-script-in-WordPress-theme.pdf.
For regular html pages, do the following:
- Locate the end tag of title, namely </title> somewhere in the top part of the page in the head section. You will only see this with a HTML editor, visual editors hide this sort of information. If you can’t find it immediately, use the search function, which generally is Control + F for Windows or Command + F for Mac.
- When found, place the cursor directly after the </title> end tag and press ENTER to create a new line.
- Paste the following line on the empty line: <script type=’text/javascript’ src=’http://www.yourdomain.com/mediaplayer/jwplayer.js’></script>
You should have something like this now:
other stuff...
<title>My HTML page</title>
<script type='text/javascript' src='http://www.yourdomain.com/mediaplayer/jwplayer.js'></script>
other stuff...
Save the page. That’s it. We are done with the preparations.
Be ready to see a complicated piece of code. if you followed Part 1 of the tutorial, it is explained line by line, so I’m not going to repeat that here. However, some parts are not there, namely all references to an individual video. Since we are going to embed a playlist, there is no need to set the attributes for a video on its own.
<div id="container1"  >Loading video...</div>
          <script type="text/javascript">
              jwplayer('container1').setup(
              {
                  'id': 'container1',
                  'wmode': 'transparent',
                  'icons': 'true',
                  'allowscriptaccess': 'always',
                  'allownetworking': 'all',
                  'width': '500', 'height': '307',
                  'controlbar': 'bottom',
                  'dock': 'false',
                  'flashplayer': 'http://yourdomain.com/mediaplayer/player.swf',
                   Here we will add the playlist attributes
               });
          </script>
You only need to adapt the width and height according to your situation. So, if you want show the video at a reasonable size, you will have to increase the width, because the playlist takes some space too and that is included in that width if you place it left or right.
For example, if you want the video itself to show at a width of 400 pixels and the playlist at 250, set the width to 650 (250+400), like this:
'width': '650', 'height': '307',
OK, when you have set it to your liking, we only need to fill in the path to the player itself:
'flashplayer': 'http://yourdomain.com/mediaplayer/player.swf',
If you called the folder mediaplayer, then just change the domain name, otherwise, adapt the folder name.
When this is set, we concentrate on the playlist part, which we will insert into the code above.
The playlist elements
This looks even more complex, but I’ll beak it down for you:
'playlist.position': 'right',
    'playlist.size': '250',
    'playlist': [
        {
           'file': 'video-1.mp4',
           'title': 'My first video',
           'provider': 'rtmp',
           'streamer': 'rtmp://xxxxxxxx.cloudfront.net/cfx/st',
           'image': 'http://yourdomain/images/thumbs/video1.jpg',
           'description': 'The Wooden Dimensions project'
        },
        {
           'file': 'video-2.mp4',
           'title': 'My second video',
           'provider': 'rtmp',
           'streamer': 'rtmp://xxxxxxxx.cloudfront.net/cfx/st',
           'image': 'http://yourdomain/images/thumbs/video2.jpg',
           'description': 'Traffic filmed on the road'
        },
        {
           'file': 'video-3.mp4',
           'title': 'My last video',
           'provider': 'rtmp',
           'streamer': 'rtmp://xxxxxxxx.cloudfront.net/cfx/st',
           'image': 'http://yourdomain/images/thumbs/video3.jpg',
           'description': 'Alesis, a mixer for Mac' } ]
The first part is playlist.position. It determines where the playlist itself shows up. This has 4 options: top, bottom, left. right. Most people prefer it on the right, but experiement with this setting to find what you like best. For this example. I’m going to place it right.
'playlist.position': 'right',
playlist.size is expressed in pixels, like width. Following the example above, I use 250.
'playlist.size': '250',
We can copy and past this under the code above, so that we get:
<div id="container1"  >Loading video...</div>
          <script type="text/javascript">
              jwplayer('container1').setup(
              {
                  'id': 'container1',
                  'wmode': 'transparent',
                  'icons': 'true',
                  'allowscriptaccess': 'always',
                  'allownetworking': 'all',
                  'width': '650', 'height': '307',
                  'controlbar': 'bottom',
                  'dock': 'false',
                  'flashplayer': 'http://yourdomain.com/mediaplayer/player.swf',
                  'playlist.position': 'right',
                  'playlist.size': '250',
              });
          </script>
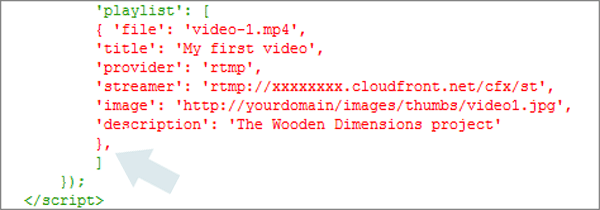
Note the comma after ‘playlist.size’: ‘250’,
As long as we have to add attributes, we need to end each attribute with a comma, to indicate that more elements are going to follow.
Therefore, the last line of code has no comma. But we are not that far yet.
Now, we get the individual videos to place in our list. A dynamic playlist is a block of code on its own. Therefore it starts with:
'playlist': [
and ends with:
]
Since this is the last piece of code in the embedding script, we do not close with a comma this time. So, now we have:
<div id="container1"  >Loading video...</div>
          <script type="text/javascript">
              jwplayer('container1').setup(
              {
                  'id': 'container1',
                  'wmode': 'transparent',
                  'icons': 'true',
                  'allowscriptaccess': 'always',
                  'allownetworking': 'all',
                  'width': '650', 'height': '307',
                  'controlbar': 'bottom',
                  'dock': 'false',
                  'flashplayer': 'http://yourdomain.com/mediaplayer/player.swf',
                  'playlist.position': 'right',
                  'playlist.size': '250',
                  'playlist': [
                   ]
              });
          </script>
After that, we place the individual videos one by one in that block. Consider this:
         {
           'file': 'video-1.mp4',
           'title': 'My first video',
           'provider': 'rtmp',
           'streamer': 'rtmp://xxxxxxxx.cloudfront.net/cfx/st',
           'image': 'http://yourdomain/images/thumbs/video1.jpg',
           'description': 'The Wooden Dimensions project'
        },
file is the name of your video. Since we are going to stream from Amazon CloudFront, you only need to give the name of the video. If your video is placed in a folder within the bucket, you need to add that as well. So, if your folder is called myproject, and the video is called video-1.mp4, then you use myproject/video-1.mp4. Otherwise, just use the name of the video. Watch it, this is case sensitive. So, Video-1 is not the same as video-1.
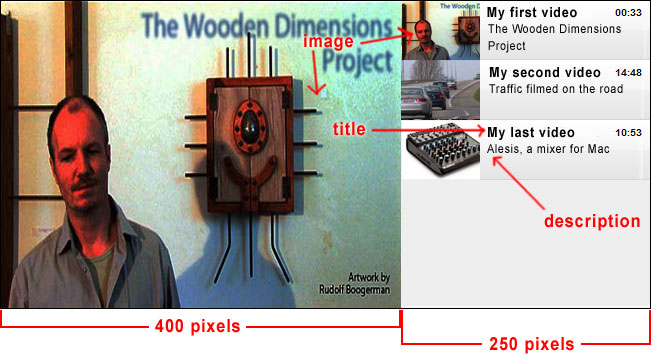
title is the title of your video. It will be shown in bold in the playlist.
provider indicates the type of media used, in this case rtmp, since we use the rtmp software delivered by the CloudFront service. That is one of the great advantages of CloudFront, you do not need to install streaming server software, it is already there for you.
streamer is the path to the rtmp software. This is always located at the streaming distribution of your bucket. Your bucket needs to be configured for streaming or this will not work. See Part 1 if you have not set a streaming distribution yet.
You only need the actual name of the streaming distribution, which is a combination of alpha characters and numbers. This can be found via the AWS console (see Part 1).
So, if your streaming distribution is http://d2v6eyhklxdwou.cloudfront.net, then you only copy this part ( in red): http://d2v6eyhklxdwou.cloudfront.net
and you replace the red part of this line:
'streamer': 'rtmp://xxxxxxxx.cloudfront.net/cfx/st',
so that you get:
'streamer': 'rtmp:/d2v6eyhklxdwou.cloudfront.net/cfx/st',
image is the thumbnail used in the playlist, but it is also used as the posterimage for that particular video. The easy way out is to place the images on your domain and use an absolute URL.
If your domain is called yourdomain.com and you placed your posterimage in the images/thumb folder, then your URL is http://www.yourdomain.com/images/thumb/myposterimage.jpg
Posterimages or thumbnails can be jpg and png. it is best to give your posterimages the same size as you plan to display the videos. Smaller sizes will be enlarged by the player and that gives a fuzzy result. Better too big then too small, but don’t overdo it, because weight matters. Heavy posterimages take long to download, especially if you have many videos in your dynamic playlist.
You may also link to posterimages on S3 amazon, but then you need a crossdomain.xml file, otherwise the images will not show up. Here is a tutorial on how to do that:
https://www.wp21century.com/using-crossdomain-xml-for-subtitles-and-playlists/
The description shows up under the title in the playlist. Keep it short because you do not have much space.
Below you see how a dynamic playlist looks and where the elements are located:

OK, now we paste our video code into the playlist block:
<div id="container1"  >Loading video...</div>
          <script type="text/javascript">
              jwplayer('container1').setup(
              {
                  'id': 'container1',
                  'wmode': 'transparent',
                  'icons': 'true',
                  'allowscriptaccess': 'always',
                  'allownetworking': 'all',
                  'width': '650', 'height': '307',
                  'controlbar': 'bottom',
                  'dock': 'false',
                  'flashplayer': 'http://yourdomain.com/mediaplayer/player.swf',
                  'playlist.position': 'right',
                  'playlist.size': '250',
                  'playlist': [
                  {
                  'file': 'video-1.mp4',
                  'title': 'My first video',
                  'provider': 'rtmp',
                  'streamer': 'rtmp://xxxxxxxx.cloudfront.net/cfx/st',
                  'image': 'http://yourdomain/images/thumbs/video1.jpg',
                  'description': 'The Wooden Dimensions project'
                  },
                  ]
              });
          </script>
Note that this time, we added again a comma to our last statement, because we plan to add 2 more video blocks.

You actually can paste the same block of code again and adapt the elements to your situation later on:
<div id="container1"  >Loading video...</div>
          <script type="text/javascript">
              jwplayer('container1').setup(
              {
                  'id': 'container1',
                  'wmode': 'transparent',
                  'icons': 'true',
                  'allowscriptaccess': 'always',
                  'allownetworking': 'all',
                  'width': '650', 'height': '307',
                  'controlbar': 'bottom',
                  'dock': 'false',
                  'flashplayer': 'http://yourdomain.com/mediaplayer/player.swf',
                  'playlist.position': 'right',
                  'playlist.size': '250',
                  'playlist': [
                       {
                        'file': 'video-1.mp4',
                        'title': 'My first video',
                        'provider': 'rtmp',
                        'streamer': 'rtmp://xxxxxxxx.cloudfront.net/cfx/st',
                        'image': 'http://yourdomain/images/thumbs/video1.jpg',
                        'description': 'The Wooden Dimensions project'
                       },
                       {
                       'file': 'video-1.mp4',
                       'title': 'My first video',
                       'provider': 'rtmp',
                       'streamer': 'rtmp://xxxxxxxx.cloudfront.net/cfx/st',
                       'image': 'http://yourdomain/images/thumbs/video1.jpg',
                       'description': 'The Wooden Dimensions project'
                       },
                    ]
              });
          </script>
You can repeat that again, so that you have 3 video blocks in there. By the way, there is no limit to the amount of videos you can add:
<div id="container1"  >Loading video...</div>
          <script type="text/javascript">
              jwplayer('container1').setup(
              {
                  'id': 'container1',
                  'wmode': 'transparent',
                  'icons': 'true',
                  'allowscriptaccess': 'always',
                  'allownetworking': 'all',
                  'width': '650', 'height': '307',
                  'controlbar': 'bottom',
                  'dock': 'false',
                  'flashplayer': 'http://yourdomain.com/mediaplayer/player.swf',
                  'playlist.position': 'right',
                  'playlist.size': '250',
                  'playlist': [
                       {
                        'file': 'video-1.mp4',
                        'title': 'My first video',
                        'provider': 'rtmp',
                        'streamer': 'rtmp://xxxxxxxx.cloudfront.net/cfx/st',
                        'image': 'http://yourdomain/images/thumbs/video1.jpg',
                        'description': 'The Wooden Dimensions project'
                       },
                        {
                        'file': 'video-1.mp4',
                        'title': 'My first video',
                        'provider': 'rtmp',
                        'streamer': 'rtmp://xxxxxxxx.cloudfront.net/cfx/st',
                        'image': 'http://yourdomain/images/thumbs/video1.jpg',
                        'description': 'The Wooden Dimensions project'
                       },
                       {
                       'file': 'video-1.mp4',
                       'title': 'My first video',
                       'provider': 'rtmp',
                       'streamer': 'rtmp://xxxxxxxx.cloudfront.net/cfx/st',
                       'image': 'http://yourdomain/images/thumbs/video1.jpg',
                       'description': 'The Wooden Dimensions project'
                       },
                    ]
              });
          </script>
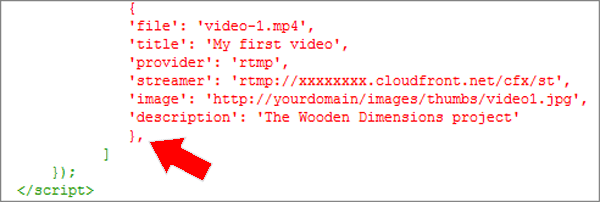
This time, I made a mistake. Can you see which mistake, given the fact this is the last video I added?

Right, I have to remove the last comma! So, here is the correct code with the red parts you can adapt according to the previous instructions:
<div id="container1"  >Loading video...</div>
          <script type="text/javascript">
              jwplayer('container1').setup(
              {
                  'id': 'container1',
                  'wmode': 'transparent',
                  'icons': 'true',
                  'allowscriptaccess': 'always',
                  'allownetworking': 'all',
                  'width': '650', 'height': '307',
                  'controlbar': 'bottom',
                  'dock': 'false',
                  'flashplayer': 'http://yourdomain.com/mediaplayer/player.swf',
                  'playlist.position': 'right',
                  'playlist.size': '250',
                  'playlist': [
                       {
                        'file': 'video-1.mp4',
                        'title': 'My first video',
                        'provider': 'rtmp',
                        'streamer': 'rtmp://xxxxxxxx.cloudfront.net/cfx/st',
                        'image': 'http://yourdomain/images/thumbs/video1.jpg',
                        'description': 'The Wooden Dimensions project'
                       },
                       {
                        'file': 'video-2.mp4',
                        'title': 'My second video',
                        'provider': 'rtmp',
                        'streamer': 'rtmp://xxxxxxxx.cloudfront.net/cfx/st',
                        'image': 'http://yourdomain/images/thumbs/video2.jpg',
                        'description': 'Traffic filmed on the road'
                       },
                       {
                        'file': 'video-3.mp4',
                        'title': 'My last video',
                        'provider': 'rtmp',
                        'streamer': 'rtmp://xxxxxxxx.cloudfront.net/cfx/st',
                        'image': 'http://yourdomain/images/thumbs/video1.jpg',
                        'description': 'The Wooden Dimensions project'
                       }
                     ]
              });
          </script>
I suggest you copy and paste this code template in a text document so that you can re-use it later on.
What you need to watch when embedding playlists
Typos are the most common problem when embedding video or audio, and this is not different for playlists. Even experienced developers make mistakes and have to check their code, so before you publish what you have done, check what you wrote, line by line.
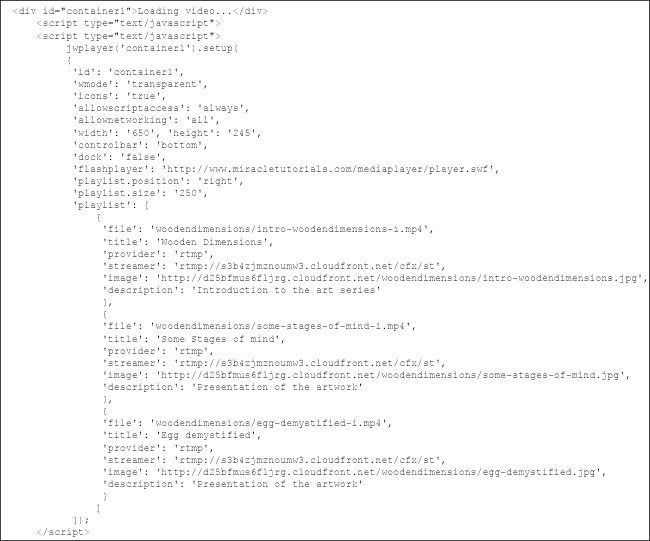
Note that I linked to posterimages (image) located on S3 Amazon. Therefore, I had to place a crossdomain.xml to give access to the images, otherwise Flash will simply ignore it for security reasons:

Very important also: This scenario only works with public video and images! Make sure to check your ACL settings.
Can I compact the code?
Yes, you can. I formatted it this way so that it looks clear and easy to check. Below you find a compact version. Spaces are not needed at all:
<div id="container1"  >Loading video...</div>
<script type="text/javascript">
jwplayer('container1').setup(
{'id': 'container1','wmode': 'transparent','icons': 'true','allowscriptaccess': 'always','allownetworking':
'all','width': '650', 'height': '307','controlbar': 'bottom','dock': 'false','playlist.position': 'right',
'playlist.size': '250','playlist': {'file': 'video-1.mp4','title': 'My first video','provider': 'rtmp',
'streamer': 'rtmp://xxxxxxxx.cloudfront.net/cfx/st','image': 'http://yourdomain/images/thumbs/video1.jpg',
'description': 'The Wooden Dimensions project'},
'flashplayer': 'http://yourdomain.com/mediaplayer/player.swf',
{'file': 'video-2.mp4','title': 'My second video','provider': 'rtmp',
'streamer': 'rtmp://xxxxxxxx.cloudfront.net/cfx/st','image': 'http://yourdomain/images/thumbs/video2.jpg',
'description': 'Traffic filmed on the road'},{'file': 'video-3.mp4','title': 'My last video',
'provider': 'rtmp','streamer': 'rtmp://xxxxxxxx.cloudfront.net/cfx/st',
'image': 'http://yourdomain/images/thumbs/video1.jpg','description': 'The Wooden Dimensions project'}
]});</script>
This will work as well, it is just not so easy to read.
That is it for now. I hope you find this useful.

Followed everything in tutorial (very well done…but no success).
Three observations
1. I am using WordPress.COM (not .org)
2. I do not have the option to update the header.php. I add the line in my post, but it disappears. Not sure how to accomodate this step.
3. I follow all the code noted about, but when I publish my WordPress post…no player appears…only the HTML code. And the line has ’ appended.
Suggestions most welcomed.
‘flashplayer’: ‘http://yourdomain.com/mediaplayer/player.swf’,
Yes, that is a problem. WordPress.com disables this sort of thing. The only option is to move to a domain hosted elsewhere with a standalone version of WordPress.
Hi,
When I try this all I get on my page is
“Loading video…”
No video, loads.. I know I am doing something wrong, because if I link the S3 buckets domain name and reference the link I it loads.
Any obvious thoughts,
Julian
Hi Julian,
Perhaps you forgot the rtmp path or made a mistake in that path. Generally, when the player does not show, there is something wrong with the syntax of the embedding code.
This can be as silly as a forgotten comma or a quote, for example. Can you provide a link to a URL so that I can have a look?
thanks for such great work ,
but is it possible to make palylist in a separate file and link to it ?
Hi Ali, yes of course. You can do it like this:
playlistfile':'http://mydomain.com/images/playlist.xml','playlist.position':'right','playlist.size':'250',
You can see this at work here: http://demo25.footprintaddons.com/demos-s3media-stream-plugin/5-playlist-with-public-streaming
thanks very much
i have another issue , i have a page contains direct links to mp3 files , but when right click to download with IDM , download starts with real file size and name , but with ( .htm ) extention instead of ( .mp3 ) .. If possible , how to solve ?
If you want to offer download links to files which are recognized by the browser, such as mp3, .txt. jpg etc… the remedy is to place them in a zip file. Then you simply link to the zip and it will be downloaded instead of played directly in the browser. This also has the advantage that you do not need to use download software at all, which most visitors do not have anyway.
execuse me , i faced a problem in applying your way ” playlistfile’:’http://mydomain.com/images/playlist.xml’,’playlist.position’:’right’,’playlist.size’:’250′, ”
i created an ( .xml ) file contains ” ‘playlist’: [
{
‘file’: ‘001.mp3’,
‘title’: ”,
‘provider’: ”,
‘streamer’: ”,
‘image’: ”,
‘description’: ”
},
{
‘file’: ‘002.mp3’,
‘title’: ”,
‘provider’: ”,
‘streamer’: ”,
‘image’: ”,
‘description’: ”
}
]
”
in the same folder of mp3 files , but when test , find ” Error loading player:
No playable sources found ”
so plz , help me create a proper xml playlist , because i have a lot of folders , each folder contains the same names but with different materials , so , i want to create only one playlist and copy it to each folder , and only link to them in my page .
What you used is exclusively meant for inline playlists. An external playlist is an xml file. Here is an example of such a playlist: http://developer.longtailvideo.com/player/trunk/fl5/js/test/examples/assets/mrss.xml
You can use that playlist and adapt the file names and other tags. Make the ones you do not plan to use empty.
In your scenario, you can indeed place the same playlist in each folder. If this folder is on S3 Amazon, you will need to create a crossdomain file to give the player access to the playlist, and place file that in the bucket.
execuse me ,
there is something i misunderstand , so plz look at wt i did in my page and in my playlist and help me find the error :-
In my htm page I added :-
Loading playlist…
jwplayer(‘container3’).setup(
{
‘id’: ‘container3’,
‘wmode’: ‘transparent’,
‘icons’: ‘true’,
‘allowscriptaccess’: ‘always’,
‘allownetworking’: ‘all’,
‘width’: ‘300’, ‘height’: ’24’,
‘controlbar’: ‘bottom’,
‘dock’: ‘false’,
‘flashplayer’: ‘scripts/jwplayer/jwplayer.flash.swf’,
‘playlistfile’:’sound/q01/playlist.xml’,
‘playlist.position’: ‘right’,
‘playlist.size’: ’70’
});
And my playlist.xml file is as :-
playlist1
track1
track2
And Many Thanks For Your Efforts
sorry , accurate settings :-
Loading playlist…
jwplayer(‘container3’).setup(
{
‘id’: ‘container3’,
‘wmode’: ‘transparent’,
‘icons’: ‘true’,
‘allowscriptaccess’: ‘always’,
‘allownetworking’: ‘all’,
‘width’: ‘300’, ‘height’: ’24’,
‘controlbar’: ‘bottom’,
‘dock’: ‘false’,
‘flashplayer’: ‘scripts/jwplayer/jwplayer.flash.swf’,
‘playlistfile’:’sound/q01/playlist.xml’,
‘playlist.position’: ‘right’,
‘playlist.size’: ’70’
});
Hi Rudolf,
Thank you for the great tutorial. Is there a way to have each item in the playlist have an HTML5 fallback as in your “How to Embed Streaming Video & Audio with HTML5 Fallback – using JW Player 5.6” tutorial?
I’ve tried it at: http://1440ltd.com/playlist-test/
But it’s not working for me at the moment. Any help would be greatly appreciated. Thank you. – Timothy
Hi Timothy, You can create an inline playlist, like this:
jwplayer('playlist1').setup  ({'flashplayer':'assets/player.swf','id':'mediaplayer1','width':'600','height':'250',
  'playlist.position':'left','playlist.size':'200','repeat':'none','autostart':'false',
  'controlbar':'bottom','dock':'false','stretching':'uniform',
  modes':[{type:'flash',src:'assets/player.swf',
      config:{'provider':'rtmp','playlist':[
         {'file':'woodendimensions/huntersimulator-i.mp4','title':'Hunting Simulator',
         'image':'http://d25bfmus6fljrg.cloudfront.net/woodendimensions/hunting-simulator.jpg',
         'streamer':'rtmpe://sk7nxvrg482n5.cloudfront.net/cfx/st'
         },
         {'file':'woodendimensions/informania-III-i.mp4','title':'Informania III',
         'image':'http://d25bfmus6fljrg.cloudfront.net/woodendimensions/informania-III.jpg',
         'streamer':'rtmpe://sk7nxvrg482n5.cloudfront.net/cfx/st'},
         {'file':'lostcorners/lost-corners-documentary-i3.mp4','title':'Lost Corners intro',
         'image':'http://d25bfmus6fljrg.cloudfront.net/lostcorners/lost-corners-intro.jpg',
         'streamer':'rtmpe://sk7nxvrg482n5.cloudfront.net/cfx/st'}
      ]}
   },
   {type:'html5',
      config:{'provider':'video','playlist':[
         {'file':'http://d2v6eyhklxdwou.cloudfront.net/woodendimensions/huntersimulator-i.mp4','title':'Hunting Simulator',
         'image':'http://d25bfmus6fljrg.cloudfront.net/woodendimensions/hunting-simulator.jpg'},
         {'file':'http://d2v6eyhklxdwou.cloudfront.net/woodendimensions/informania-III-i.mp4','title':'Informania III',
         'image':'http://d25bfmus6fljrg.cloudfront.net/woodendimensions/informania-III.jpg'},
         {'file':'http://d2v6eyhklxdwou.cloudfront.net/lostcorners/lost-corners-documentary-i3.mp4','title':'Lost Corners intro',
         'image':'http://d25bfmus6fljrg.cloudfront.net/lostcorners/lost-corners-intro.jpg'}
      ]}
}]});
Where the type:’html5′ mode determines the link to the progressive download videos. This does not have to be the same video, it can be a smaller version, located elsewhere. In this example I use AWS CloudFront. The videos do not work here, by the way. They are set to private.
A working example can be found here: http://footprintaddons.footprintcommunication.be/products/demos-s3media-stream/201-dynamic-inline-playlist-with-private-streaming
Thank you. That worked great.
Can we add duration to the playlist preview. Just like in youtube
Sorry Anuj,
I somehow missed your comment between tons of fake comments. You can add this in the description of the video. It is not automated, like in YouTube.
hello thanks it was nice but i m getting error .i know i done some mistake my videos not playing i m getting like dis error (Error setting up player Invalid license key)..
and one more thing i have two question on it ..
1. can we add videos dynamically in it ?
2.can we play youtube videos on my videos player .
it was my question i hope u understand my question n problem thanks i ll b waiting for ur reply
Hi Bharati,
This tutorial is meant for JW Player 5.10. The fact that you get a license key error means you are using JW Player 6 or higher.
The embedding code for these versions is substantially different.
To add videos dynamically, you would have to write a script which is beyond the scope of this tutorial.
If you talk about RTMP streaming, dynamic playlists are only possible with JW player 5.10 and lower.
And yes, you can embed youtube videos, np problem. In fact, you can mix youtube and other resources in the same playlist.
I will create a tutorial for JW Player 7 (which has the same embedding method as 6) before the end of August.
thanks for explanation sir ..i ll b waiting for dat tutorial JW Player
Hi Bharati, there will be a slight delay on the tutorial because JWPlayer is changing its system and they told me that they can only provide me with a JWplayer 7 account in two weeks. I asked them to send me the free version, so that I can test, but haven’t received it yet.
I can get this to work no problem if I have a bunch of different files. But I only have ONE file, but need to jump (seek) to different points in the timeline, and use each playlist “item” as a link to that timeline jump. How can I modify your code for this purpose? Thanks
Hi Adrian,
Yes this is possible by adding:
‘start’:’60’,
‘duration’: ‘120’,
For each video.
start:’60’ means that the video starts at 60 seconds from the beginning, and duration: ‘120’ means that the video will stop at 120 seconds from the beginning, meaning that the video plays 1 minute.
Therefore, duration is not the length of time you want it to play, but the end point where you want the video to stop in the timeline. duration value is always bigger then the start value.
Then for the next one, you could define:
‘start’:’120′,
‘duration’: ‘180’,
These values can contain decimals, like 20.5
I hope this is clear to you?