Some video converters do not get it right when converting video to MP4 to stream on S3 Amazon/CloudFront. Especially the cheaper converters like AVS Video Converter for Windows tend to have problems. Luckily, there is a trick to fix this problem. Here you find a video tutorial on how to get the correct settings from this cheap, but convenient, converter for Windows. The purpose is to create an MP4 profile which you can use as a basis to start from for your videos.
This tutorial is part of our Smooth S3 Operation tutorial series that will come out very soon and here you have a foretaste. Below the video, you find the text version with screen shots. Best play the video full screen:
I actually have a love-hate relationship with AVS Video Converter because it had quite a few very crappy updates in the past and there are always some hidden skeletons in the closet, so to speak (see also: new-avs-converter-has-bugs/). Yet, version 7.1.2.480 works quickly, has an impressive amount of setting options, while for novices, the standard mode produces very acceptable results. And MP4 conversion works fine, once you know how to set it up. As such, you can have a useful converter for only $39 which rivals easily with Sorenson Squeeze 6 in terms of quality output when it comes to video tutorials.
I’m not saying AVS Video Converter is better then Sorenson Squeeze, but it is easier to get a good result with AVS converter as a novice, especially with screen capture video, like the video above. Therefore, with the parameters I show here you will get a great result. I’m not going very deep into the technical details, although I try to explain some key information so that you understand what all those settings are about. You can ignore these explanations and just follow exactly what I do here or follow the explanations, so that you might be able to tweak some settings to enhance the outcome. Just go with your temperament, I would say. 😉
Setting the video type as the foundation for our custom MP4 profile
Open AVS Video Converter and select MP4 as the output format and click on the button Browse… to select the video to convert:
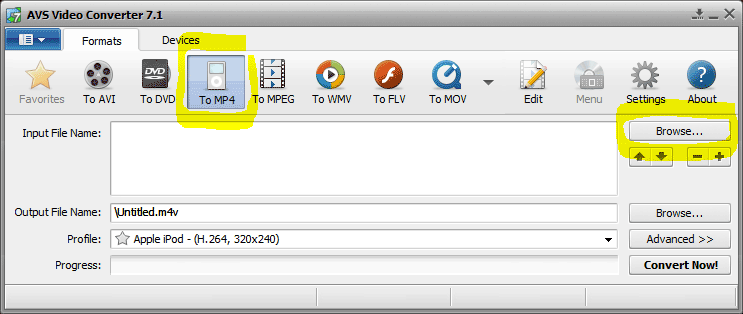
Adjust the MP4 parameters
The video provided i this tutorial is converted with the settings you’ll find below.
Standard, you get a set of parameters for MP4 that will result in a video that plays nicely on your computer but when you stream the video on S3 Amazon, or more precisely via S3 CloudFront, it only shows a black screen with audio. Therefore, we have to adjust a couple of settings:
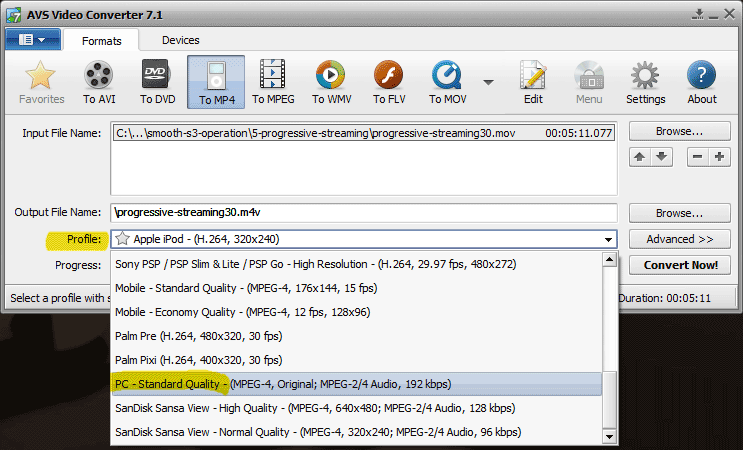
For Profile, select PC standard Quality as the profile to work from. When the profile is selected, click the Browse… button on the right from the Output File Name to select the name of the converted video and the folder in which you want to save that video:
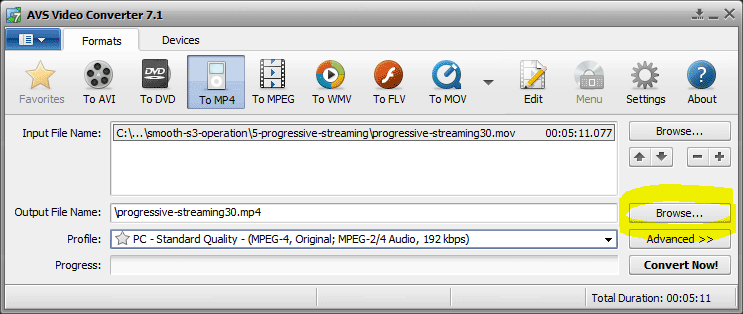
When that is done, click the Advanced >> button next to the Profile because this is the moment to adapt the profile to suit our needs:
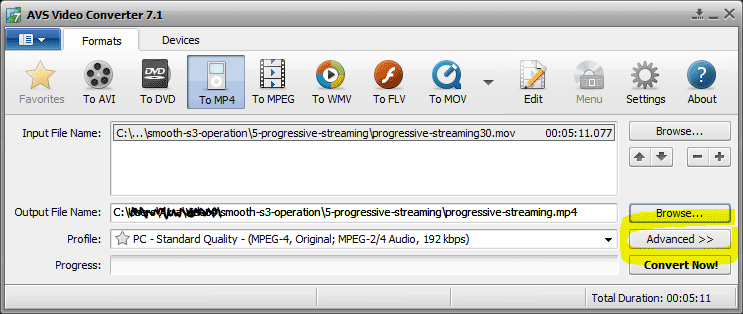
A whole range of options show up now. Highlighted in yellow, you find a couple of settings that you need to set as they are shown here:
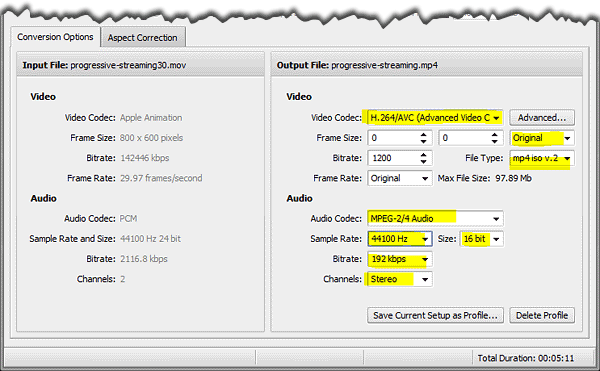
Set the Video Codec to H.264 (Advanced Video Codec). Codec means the compression method.
Set the Frame Size to Original to keep it the same in size as the video you want to convert and set the Frame Rate to Original as well.Frame rate is the amount of images (frames)produced per second. For MP4 this is ideally 29.7fps (frames per second). Set File Type to mp4 iso v.2.
Bitrate is the amount of Kilobits per second (Kbps) that is used to determine the quality of the video. The higher the setting, the better the quality but the bigger the file. It can vary depending on the type of video you want to convert, therefore you do not have fixed rules for this setting. In this example, it is set to 1200.
In AVS Video Converter, 800Kbps gives a smaller file size but lower quality, while 1000Kbps gives a medium result and 1200Kbps gives high quality but bigger file size. With other converters like Sorenson Squeeze, 1200Kbps is rather medium, so do not regard these settings as general, they are native for this converter. In some situations you may have to go higher.
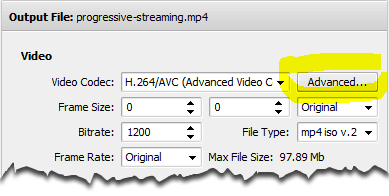 And now we come to the part that we only have to set once and then save it as a profile. Click on Advanced… next to the Video Codec drop down list:
This opens a group of options specifically for the H.264 codec, consisting of 4 tabs. We start with the Bitrate tab:
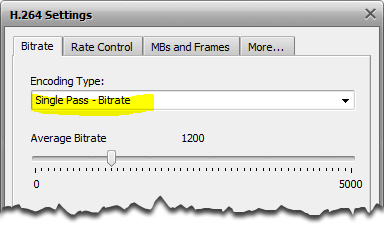
For Encoding type, you can select Single Pass – Bitrate. This type of encoding is used to convert the video with a more or less constant target bitrate. This method converts the video relatively fast, while keeping good quality. If you want constant video quality, you may select Single Pass – Quantizer instead. The file size will probably be higher in that case. But for now, just follow along and take the suggested type.
Now select the tab Rate Control. This has quite a few settings. Luckily we only need to do this once. You can just copy the values in here and be done with it or read the explanation below to get an understanding of these attributes:
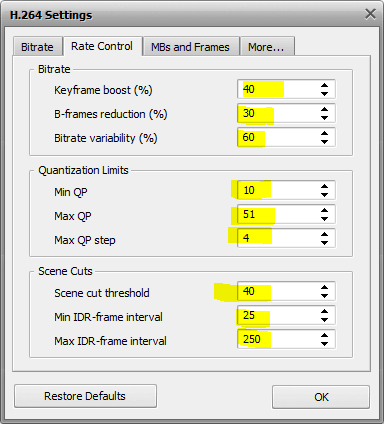
We have 3 major groups here: Bitrate, Quantization Limits and Scene Cuts. I’m not going too deep into detail here, yet some bits need an explanation. If you want to know more in detail, have a look at the detail page on AVS4You.
The Bitrate group has a direct impact on the encoding type Single Pass – Bitrate which we chose earlier on.
Set the Keyframe boost to 40%. The higher this setting, the better the visual quality but the bigger the file size, so be careful. Values vary from 0 to 70. Keyframes (also called I-frame) are the full uncompressed images used to calculate the color values of the neighboring frames. The frames in between keyframes (P-frames and B-frames) are then calculated and compressed in relation to those keyframes. If you want to know more on this subject, wikipedia has a very good explanation.
Set the B-frames reduction to 30%. B-frames are responsible for the interpretation of motion in the video. This setting determines the reduction of quality in B-frames in favor of P-frames (predicted picture). This reduction is in most cases not visually noticeable to the human eye but as with everything, don’t overdo it. Values vary from 0 to 60.
Set the Bitrate variability to 60%. This attribute indicates in how far the bitrate is allowed to vary in relation to what we set in the beginning (1200). Roughly explained, a variable bitrate tells the encoder to vary bitrate as needed, based on the information in the frames (images). It will not use a bitrate of 1200Kbps on frames which only need 400Kbps, for instance. Therefore, if you set a high percentage, you give the encoder a lot of freedom, generally resulting in more stable quality. However, this is a double edged sword because it can in some cases add more Kbps to the assigned bitrate if the need arises. 60% is therefore a good average to start from. Values vary from 0 to 100.
Quantization Limits are only used when you select Single Pass – Quantizer, but it is a good idea to set a default for this already, so that it is saved within your profile for later use. The settings as shown are strongly recommended:
Min QP (Quantizer Parameter) is 10. Values vary from 0 to 50. Very high values are not recommended as they result in ridiculously high bitrates and low resolution.
Set the Max QP to 51 (values 0-51)and the Max QP Step to 4 (values 0-50).
Scene Cuts determines the sensitivity of the codec for scene changes in the video. Set the Scene Cut Threshold to 40. The higher the value, the lower the sensitivity of scene change detection. Therefore, if you have a dark video, you best set this value lower so that the encoder detects subtle changes more easily. Values range from 0 to 100.
Set the Min IDR-frame interval to 25. IDR means Instantaneous Decode Refresh, a complicated expression to indicate the amount of frames in between before the encoder can detect a new scene change. Setting this to high will result in not detecting enough scene changes. Setting it too low results in an unnecessary high bitrate (read: big file size and waste of bandwidth). Values range from 0 to 100000.
Set Max IDR-frame to 250. Values vary from 0 to 100000, but 250 is an excellent average. Setting this too low results in too many keyframes and as such wasting bitrate for nothing. Too high can create seeking issues in the video and produce artifacts. Artifacts are those strange and fluffy clusters of pixels blocks you sometimes see in badly compressed videos:

As you can here, deforming pixel clusters and blurring takes place due to low quality compression.
Let’s move on to the MBs and Frames Settings:
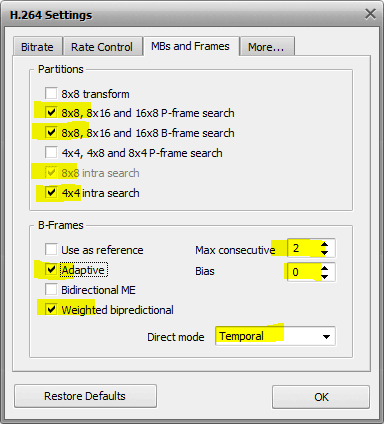
The partition searches increase accuracy and compression efficiency. As a general rule, the more search types are performed, the better and stronger the compression will be while maintaining a high quality output. For instance, the 8×8 transform is a very powerful compression technique but alas not compatible with every device (mobiles may have trouble with it). Therefore, I left it empty here. Disabling searches increases the encoding speed at the expense of quality. Best take over what I did here:
Check 8×8, 8×16 and 16×8 P-frame search
Check 8×8, 8×16 and 16×8 B-frame search
Check 8×8 intra search and 4×4 intra search
If you want a full explanation on these settings, have a look at the technical document by AVS4You.
When ready, click the tab More…
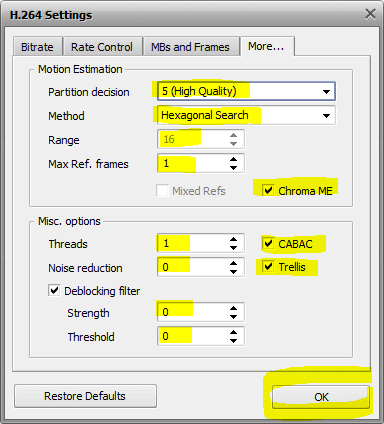
You see two groups here: Motion Estimation and Misc. Options (Miscellaneous):
In Motion Estimation, set Partition decision to 5(High Quality). This controls the precision with which the motion in the video is estimated. Values range from 1 to 6. You do not want to go lower then 5. A setting of 6 is even better but it strongly increases the amount of time needed for the conversion.
Set Method to Hexagonal Search if you have an average computer. Uneven Multi-hexagon is meant for powerful computers, while Exhaustive search works only on super computers. The better the method, the more efficient compression and high quality output.
Range is automatically disabled when you select Hexagonal Search. It only works with the powerful methods and it specifies the motion search in the pixels. The more pixels are examined, the more processor power is needed, but the better the outcome. That said, Hexagonal Search gives a good result, so don’t worry about it.
Set Max. Ref. Frames to 1. This indicates how many previous frames can be referenced by a P-frame or B-frame (again see the Wikipedia page for more info on I,P, B-frames). The higher this value, the better the quality at the expense of speed. Values varies from 0 to 16.
In Misc. options, set Threads to 1 if you have one processor core on your computer. Depending on your configuration, you can increase this. If you are unsure if your computer is multi-core or not, leave it at 1. The more cores are used, the faster the encoding works. Values vary from 1 to 4.
Enable CABAC, or to use an incomprehensible expression: Context Adaptive Binary Arithmic Coding. This basically increases the efficiency of compression without quality loss. This should only be unchecked if the video is played on a portable device with a slow processor.
Trellis is only available with CABAC on. It improves quality, while maintaining a small file size but it will increase conversion time slightly. It is worthwhile to have it enabled.
Noise Reduction, this setting depends if there is noise in your video images or not. Videos with noise appear grainy, as if sprinkled with sand. Noise Reduction filters out that noise and the more noise you have, the higher you need to set the value. Varies from 0 to 65535. In screen capture as the video above, you can set this to 0 as there is no noise whatsoever.
Deblocking filter can be enabled or disabled, depending on your video. If filters out eventual blocks of pixels as you may find in compressed videos.
Strength determines how strongly these blocks are eliminated in conjunction with the Threshold value.
Threshold determines how much needs to be deblocked in the video. The higher the value, the more the video is perceived as being full with blocks that need elimination.
Here both are set to 0, which basically is the same as Deblocking filter disabled because with these settings, it doesn’t do anything. With screen captures, you generally have no blocks unless the video is compressed already at low quality. Values vary from -6 to 6.
OK, that was it! We are ready to save this profile for re-use:
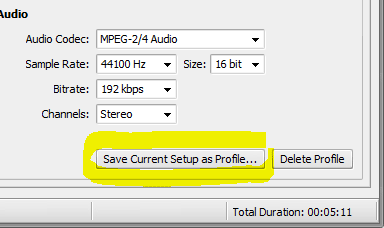
Click then on Save Current Setup as Profile… button.

Give it a descriptive name with enough details to let you know what this profile is about. Here, I indicate that this is a MP4 profile for video tutorials of 800×600 pixels in size with a bitrate of 1200. Once you saved this profile, you can start from it next time and tweak the settings to suit your video.
Keep in mind that every video is different. A talking head is another story then a video full of action scenes, or like here, a video that consisting primarily of screen shots with little movement. In the beginning, you may spend quite some time getting the settings right for your own videos, but once you get it right, you can save it as a profile. Thus, making the work flow a lot quicker.
Keep that bitrate in check!
A typical mistake of beginners is to set the quality too high. You need to find the right balance between quality and Kbps to stream a video effectively. The bitrate has not only a direct impact on smoothness of playback, it also relates to cost since the higher the setting, the more bandwidth is consumed. If you have a lot of traffic on your site, finding the right balance will reduce cost considerably, even if S3 Amazon is a cheap solution.
Also, the higher the bitrate, the more kilobits per second that need to pass via the internet connection of your visitor. Some visitors have a slow connection, which gives another reason to go easy on bitrates.
Always try to find a quality setting that is acceptable, yet light in weight. Do not presume that all your visitors value quality over speed. A wonderful video stuttering every second is much more annoying then a video showing some minor artifacts here and there.
Is this understandable to you?
I hope this tutorial is useful to you, but if there is something you do not understand, don’t hesitate to leave a comment below and I respond to your query.


Thanks heaps for this tutorial, apart from being able to make our videos stream with AVS Video converter (which is a great suite of programs, and cheap) I learn’t a lot about video from this articles as well. So well done, thanks very much for putting it together.
GREAT tutorial , thanks.
wonderful tutorial.
i am learning how to improve a video shot in vcd format. this tut is very helpful in using the AVS
$39? Windows-only? Why does this AVS thing exist? Use Handbrake, people!
Handbrake is very good, yes. We actually have several tutorials for it. Just type the name in the search box on the right.